
- Ingest & import picture files to your storage and editing software
- View and make image selections
- Make image adjustments
- Export files ready to publish or deliver to client
If you are new to Lightroom, complete viewing this section before going on to the next section with a card of images ready to ingest and work with in Lightroom. If you are using another editing software simply transfer the principles to your chosen software.
Watch this video for an overview of what’s covered in this section.
Lightroom catalogues:
Check out this video for quick a demonstration of Lightroom’s catalogue concept, which enables Lightroom’s nondestructive editing.
Lightroom catalogues are essentially databases. Think of Lightroom catalogues as a traditional card catalogue system in a library. Every time a new book enters a library, a card is created for it, with information like the title, author and subject, as well as the location of the book. The books are not physically in the card catalogue of course; they are on the shelves.
It’s the same when you view images in Lightroom – you are not looking at your actual picture files, but at reference preview files that represent your pictures. Any adjustments you make changes the way pictures appear in Lightroom but those changes are not applied to original images files.
The great thing about this is that it means that all of the work you do in Lightroom is non-destructive, that means all of your original picture files remain intact. To make the changes and images adjustments apply, you export new files with the adjustments you’ve made. This non-destructive nature is one of Lightroom’s biggest assets. It means you can work safely and make a number of adjustments while never losing the original file.
Don’t think you can import pictures into Lightroom and delete them from your chosen storage space. Also, unless you have a good reason to do otherwise, start with a single catalogue Lightroom only displays one catalogue at a time and it makes sense to have everything in one place.
Picture Archives:
Before we get going and open Lightroom, I want to give you a little advice about organising your picture archive outside Lightroom. Remember Lightroom is not your picture archive; it’s a digital workflow to help you manage your archive. To work efficiently, both in and out of Lightroom, you’ll need to create a location and system to store your picture archive.
It doesn’t matter how you organise your archive as long it’s systemised, I organise my archive in chronological date order, but I also include a shoot reference and client reference to quickly track files.
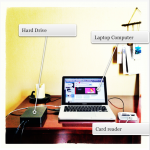
You are going to be working with a lot of images, probably way too many to store on your computer, so I’d strongly suggest you buy a dedicated external hard drive to store your picture archive. This is my set up on the right. The hard drive containing my image archive is plugged into my computer. A one or two terabyte drive should keep you going for at least a year.
Lightroom loses links if you start arbitrarily moving folders or renaming them outside the program. Renaming folders is akin to switching the jacket of a book in the library.
Finally, it also makes sense to make a back copy of your dedicated hard drive for back up, in case of fire damage or theft. Now it’s time to go to the next section and launch Lightroom.
Continue to the next section:Photo Editing: Import to export